


UMIDIGI Power 5: Screen Replacement
Key features for a Umidigi Power 5 replacement screen
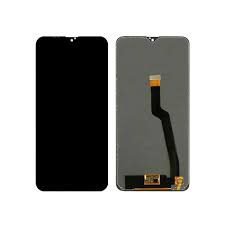
- Compatibility: Umidigi Power 5
- Size: 6.53 inches
- Resolution: 720 x 1600 pixels
- Technology: IPS LCD
- Touch sensitivity: Responsive and accurate
KSh 4,500.00
CompareIntroduction to UMIDIGI Power 5 Screen Replacement
The UMIDIGI Power 5 is a popular budget-friendly smartphone known for its robust performance and long battery life. However, like any other smartphone on the market, it is not immune to common issues that often plague mobile devices. Accidental drops, screen cracks, and touch response problems are some of the frequent issues that users of the UMIDIGI Power 5 might encounter. These problems can severely affect the functionality and aesthetics of the device, making screen replacement a necessary maintenance task for many users.
Knowing how to replace the screen on your UMIDIGI Power 5 can offer numerous advantages. One of the most appealing benefits is cost savings. Professional repairs can be expensive, especially if warranty coverage has expired. By opting for a DIY screen replacement, you can significantly reduce repair costs. Additionally, learning to replace the screen yourself means you won’t have to rely on repair shops, which can be particularly convenient if you live in a remote area or have a tight schedule.
This guide is designed to take you through the entire process of replacing the screen on your UMIDIGI Power 5 step-by-step. From gathering the necessary tools to successfully installing a new screen, we aim to make the procedure as straightforward as possible, even for those with limited technical expertise. By following our detailed instructions, you can restore your UMIDIGI Power 5 to its former glory, enjoying a fully functional device without the hassle and expense of professional repair services.
Tools and Materials Needed for Screen Replacement
Embarking on the screen replacement journey of your UMIDIGI Power 5 necessitates a selection of essential tools and materials. To achieve a smooth and successful repair process, it is crucial to procure the right equipment, ensuring not only efficiency but also safeguarding your device from further damage.
First and foremost, acquiring a compatible replacement screen tailored specifically for the UMIDIGI Power 5 is paramount. To guarantee compatibility and optimal fit, it is advisable to purchase from reliable sources or stores specializing in smartphone parts. Examples include iFixit or eBay, where you can often find OEM (Original Equipment Manufacturer) screens.
A comprehensive set of precision screwdrivers is indispensable. These screwdrivers are designed to handle the tiny screws that secure the smartphone’s components. A quality set typically includes various sizes of Phillips and flathead screwdrivers, ensuring you have the right tool for each particular fastener encountered during the repair.
Plastic opening tools and tweezers also play a critical role. Plastic opening tools assist in prying open the phone’s casing without causing scratches or bending, while tweezers help in handling small components that need to be carefully placed or removed during the disassembly and reassembly processes.
When disassembling smartphones, adhesion preservation is vital. Thus, adhesive strips are necessary to securely attach the new screen. It’s recommended to use high-quality adhesive strips specifically designed for smartphones to maintain the integrity of the repair.
Finally, a heat gun or hairdryer is essential for loosening the adhesive that secures the old screen. Controlled application of heat softens the adhesive, allowing for easier removal of the damaged screen without inflicting harm to the internal components.
By equipping yourself with these indispensable tools and materials, you lay the foundation for a successful UMIDIGI Power 5 screen replacement, ensuring your device is restored to optimal working condition.
Step-by-Step Screen Replacement Process
Replacing the screen on a UMIDIGI Power 5 involves several meticulous steps. Careful attention to detail is essential to ensure a successful replacement without damaging other components of the device.
First, power off the UMIDIGI Power 5 and remove the SIM card tray using the provided tool or a small paper clip. Gently pry off the back cover of the device with a plastic opening tool, starting at one corner and moving around the edges. Be cautious to avoid damaging the cover or internal components.
Next, disconnect the battery by carefully lifting the connector, which is usually secured with a small piece of tape. To avoid short circuits, it’s crucial to ensure the battery is fully disconnected before proceeding.
Use a heat gun or a hair dryer to gently heat the edges of the screen. This will soften the adhesive holding the old screen in place. Once the adhesive is pliable, use a plastic pry tool to cautiously lift the screen from the frame. Work slowly to avoid cracking the screen further or damaging the internals.
With the screen detached, you will see a series of small screws securing the screen connectors to the motherboard. Carefully unscrew these with a precision screwdriver and keep track of their placement for reassembly. Detach the connectors by lifting them gently, ensuring you do not apply excessive force.
Prepare the new screen by aligning it with the device frame, ensuring all connectors are in the correct position. Reattach the connectors to the motherboard and secure them with the screws previously removed. Check that each connection is firm to avoid any operational issues once reassembled.
Before sealing the device back up, cautiously reattach the battery connector. Place the back cover on the device and gently press around the edges to secure it. Reinsert the SIM card tray and power on the UMIDIGI Power 5 to test the new screen. Ensure everything functions correctly before finalizing the process.
By following these detailed steps, you can successfully replace the screen on your UMIDIGI Power 5, ensuring continued optimal performance without the need for professional repair services.
Testing the New Screen and Final Touches
After successfully installing your new UMIDIGI Power 5 screen, it is crucial to conduct a series of tests to ensure it is functioning correctly. Firstly, power on the device and check for any immediate issues such as dead pixels or non-responsiveness. Begin with touch responsiveness by navigating through various apps and swiping on the home screen. Ensure each part of the screen registers your touch accurately and without delay.
Next, verify the screen brightness and color accuracy. Adjust the brightness settings from minimum to maximum and observe any abnormalities. Open a few colorful images or videos to gauge the display’s color balance and vibrancy. If the colors appear washed out or uneven, it could indicate an improperly connected screen.
During this process, you may encounter common issues such as screen flickering, lack of responsiveness, or connection problems. Screen flickering often stems from a loose connection. Power off the device and double-check all connections, ensuring they are tightly secured. If the screen remains unresponsive, confirm whether the new screen is compatible with your device model.
Once the functional tests are completed, focus on the final touches to secure your screen replacement. Evenly apply any adhesive provided with the new screen or use specialized mobile repair adhesives. Carefully reassemble your device, following the reverse order of disassembly. Make sure each component is placed properly to avoid future complications.
To conclude, gently handle your UMIDIGI Power 5 and observe its operation in the hours following the screen replacement. Should any issues arise beyond your expertise, seek advice from a professional repair service. A carefully tested and securely reassembled device will ensure optimal performance and longevity.


There are no reviews yet.