


UMIDIGI A5 Screen Replacement
Key features for a UMIDIGI A5 replacement screen:
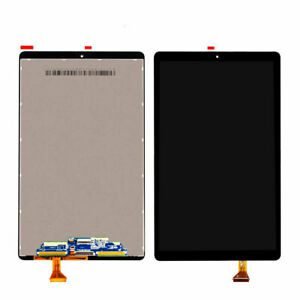
- Compatibility: UMIDIGI A5
- Size: 6.3 inches
- Resolution: 720 x 1520 pixels
- Technology: IPS LCD
- Touch sensitivity: Responsive and accurate
KSh 5,000.00
CompareIntroduction to UMIDIGI A5 Screen Replacement
The UMIDIGI A5 is a popular budget-friendly smartphone known for its robust features and sleek design. However, like any mobile device, it is not immune to damage, particularly to its screen. Accidental drops, cracks, or other forms of display malfunction are common issues that can interfere with the device’s optimal performance.
Screen damage can significantly impact the user experience, leading to problems with touch sensitivity, display clarity, and even possible internal damage if not addressed promptly. Whether it’s a minor scratch or a significant crack, it is crucial to consider screen replacement as an effective solution to restore your device.
Moreover, opting for a UMIDIGI A5 screen replacement is often a cost-effective alternative compared to purchasing a new smartphone. With the availability of reasonably priced replacement screens and DIY repair kits, many users find it feasible to repair their devices themselves. By undertaking a screen replacement, not only can you extend the lifespan of your UMIDIGI A5, but you also contribute to reducing electronic waste, promoting a more sustainable approach to technology use.
In essence, understanding the common reasons and importance behind UMIDIGI A5 screen replacement is the first step towards maintaining the functionality and aesthetics of your smartphone. Prompt attention to screen issues can prevent further complications and save costs in the long run, making screen replacement a practical and wise decision for UMIDIGI A5 users.
Necessary Tools and Preparatory Steps
Successfully undertaking a UMIDIGI A5 screen replacement necessitates the use of specific tools, meticulous preparation, and a methodical approach to ensure a smooth and efficient process. To begin with, gather essential tools including a small Phillips-head screwdriver, which is vital for removing the device’s screws, and a suction cup, which aids in gently lifting the screen. Plastic prying tools are indispensable for safely separating the screen from the body without causing damage. Additionally, tweezers are crucial for handling small components with precision. Of course, a high-quality replacement screen, compatible with the UMIDIGI A5, is essential for a successful outcome.
Equally important is the environment in which you perform the screen replacement. Ensure that you are working in a clean, well-lit area to enhance visibility and reduce the risk of losing small parts. Wearing an anti-static wrist strap is strongly recommended to prevent electrostatic discharge, which can irreparably damage the phone’s delicate circuitry.
Before beginning the replacement, there are several preparatory steps that need to be followed. Firstly, power off the UMIDIGI A5 completely. This minimizes the risk of electrical damage and ensures safety. Remove the SIM card tray to prevent obstruction during the replacement process. It is also beneficial to organize your workspace by arranging all tools and parts methodically. This improves workflow and reduces the likelihood of misplacing any component.
Lastly, sourcing quality replacement screens and tools is fundamental to achieving a professional repair. Reputable suppliers often provide components that meet or exceed original specifications, ensuring longevity and functionality. Reading reviews and consulting forums can help identify reliable sources.
Step-by-Step Screen Replacement Process
Replacing the screen of the UMIDIGI A5 requires a methodical approach to ensure the phone’s components remain intact. Begin by turning off the device and removing the SIM card tray. Use a plastic opening tool or a guitar pick to carefully pry off the back cover, beginning at a corner and working around the perimeter to release the clips that secure it to the frame.
Next, locate and carefully disconnect the battery connector to prevent any electrical damage. Using a small Phillips screwdriver, remove all visible screws securing the motherboard cover, and then gently lift the cover off. Identify the screen ribbon cable and other visible connectors, and use a spudger or your fingernail to gently disconnect them.
To remove the damaged screen, apply a moderate amount of heat using a heat gun or hair dryer. Focus the heat around the screen edges for about 1-2 minutes to soften the adhesive. Once heated, use a suction cup to create a small gap between the screen and frame. Insert a plastic prying tool into the gap and slowly maneuver it around the screen’s edges. Be mindful of the display cables to avoid damaging them.
After successfully detaching the damaged screen, carefully clean the frame to remove any residual adhesive. Prepare the new screen by aligning it with the frame and threading the ribbon cable through the opening. Gradually lower the screen into place, ensuring it sits flush with the frame. Reconnect all previously detached cables, making sure each connector is secure.
Reattach the motherboard cover and secure it with the screws removed earlier. Reconnect the battery connector, place the back cover onto the phone, and press around the edges to snap it back into place. Finally, power on the device to test the new screen. Check for full functionality by testing touch responsiveness and display clarity.
Post-Replacement Testing and Troubleshooting
Once the new screen has been installed on your UMIDIGI A5, it is imperative to conduct thorough testing to confirm that it is functioning correctly. Begin by checking for touch responsiveness. Navigate through the device’s settings and various apps to ensure that the screen responds accurately and promptly to your touch inputs. Pay close attention to any areas that might be less responsive, which could indicate potential installation issues.
The next step is to evaluate the display clarity. Examine the screen for any inconsistencies in brightness, color accuracy, or pixel defects. A uniform display with clear, vivid colors typically signifies that the screen has been installed correctly. If you encounter any issues like uneven lighting, unusual color bands, or a blank screen, these could be indicative of problems such as loose connections or defective parts.
Troubleshooting common screen replacement issues involves several checks. For unresponsive touch, confirm that all connectors are securely seated. Sometimes, reinserting connectors can resolve these issues. If the screen remains blank, inspect the internal connections and double-check whether the display was correctly powered on. Flickering displays can be a result of software issues or an incompatible screen, therefore, ensure that the latest firmware is installed on your UMIDIGI A5.
Responsible disposal of the old screen is also crucial. Avoid throwing electronic components in general waste. Instead, locate a local recycling center that accepts electronic waste, ensuring it is disposed of in an environmentally friendly manner. This step helps mitigate the impact of e-waste on our environment.
To prolong the lifespan of your newly installed screen, consider applying a high-quality protective screen cover. This will guard against scratches and minor impacts. Additionally, investing in a sturdy phone case with reinforced corners can further protect against accidental drops and impacts, effectively extending the durability of your UMIDIGI A5’s new screen.


There are no reviews yet.