


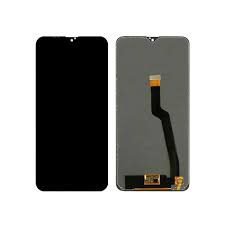
Your Oppo Reno 11F: Screen Replacement
Availability:In Stock!
Features
- Dual Sim, 3G, 4G, 5G, VoLTE, Wi-Fi, NFC, IR Blaster
- Dimensity 7050, Octa Core, 2.6 GHz Processor
- 8 GB RAM, 256 GB inbuilt
- 5000 mAh Battery with 67W Fast Charging
- 6.7 inches, 1080 x 2412 px, 120 Hz Display with Punch Hole
- 64 MP + 8 MP + 2 MP Triple Rear & 32 MP Front Camera
- Memory Card (Hybrid)
- Android v14
KSh 17,500.00
CompareIntroduction to Oppo Reno 11F Screen Replacement
The Oppo Reno 11F is known for its sleek design and high-resolution display, which enhances the user experience. However, despite its technological advancements, the screen is still susceptible to damage from various factors. Common issues prompting the need for a screen replacement include cracks resulting from accidental drops, unresponsive touchscreens that hinder navigation, dead pixels that mar the visual quality, or other display malfunctions that compromise the functionality of the device.
Screen replacement becomes essential when these problems affect the usability of the smartphone. The process of replacing the screen on an Oppo Reno 11F may appear daunting, but understanding the steps involved can make it more manageable. The entire procedure encompasses several crucial stages: assessing the damage, acquiring the necessary replacement parts and tools, powering down the device, carefully removing the damaged screen, and installing the new screen. Each step requires meticulous attention to detail to ensure the device’s performance is restored to its original state.
This blog will provide a detailed guide on how to replace the screen on your Oppo Reno 11F. For DIY enthusiasts, learning the process helps in saving costs associated with professional repairs. Furthermore, understanding the intricacies of screen replacement can prepare users for maintaining their devices more effectively over time. As we delve into the subsequent sections, we will cover the specific tools you’ll need, the step-by-step instructions for the replacement, and essential tips to ensure a successful repair. By the end of this guide, you will have a comprehensive understanding of how to replace the screen on your Oppo Reno 11F confidently and safely.
Gathering the Necessary Tools and Parts
Before embarking on the task of replacing the screen on your Oppo Reno 11F, it’s crucial to have all the necessary tools and parts ready. Ensuring you have the right equipment not only simplifies the process but also minimizes the risk of damage to your device.
The primary item you’ll need is a new screen assembly specifically designed for the Oppo Reno 11F. It’s important to source a high-quality replacement screen to ensure functionality and durability. Trusted online marketplaces like Amazon, eBay, and specialized electronics parts stores are excellent places to purchase these screens. Reviews and ratings can provide valuable insights into quality and reliability.
You’ll also require a precision screwdriver set, particularly those with Phillips and flathead bits, as these will be essential in removing and reattaching screws. A precision set ensures that the correct sizes are available, preventing any accidental stripping or damaging of screws.
Plastic prying tools will be vital for safely separating the screen from the body without scratching or breaking the components. These tools are gentle yet effective, making them preferable over metal tools which could cause damage.
Tweezers will assist in handling small screws and components delicately. Their precise tips allow for controlled maneuvering in tight spaces. Furthermore, obtaining adhesive strips is necessary to secure the new screen in place firmly; make sure these are compatible with the Oppo Reno 11F model.
A heat gun or hairdryer is required to soften the adhesive holding the existing screen. This will make it easier to remove without causing damage to other parts of the phone. Exercise caution to avoid overheating the device, which could lead to other complications.
Having all these tools and parts ready before you begin will ensure a smoother and efficient repair process. Each component plays a critical role in the replacement procedure, and preparation is key to a successful screen replacement.
Step-by-Step Guide to Replacing the Screen
Replacing the screen on your Oppo Reno 11F may seem like a daunting task, but with the right preparation and careful attention to detail, it can be done efficiently. Here, we provide a comprehensive step-by-step guide to help you through the process. Before beginning, gather all necessary tools, including a small Phillips screwdriver, a plastic pry tool, tweezers, and a replacement screen for the Oppo Reno 11F.
First, prepare your workspace. Ensure you are working on a clean, flat surface with sufficient lighting. Power off your device completely before proceeding to avoid any accidental short circuits. Once the phone is powered off, remove the SIM card tray using the SIM ejector tool.
Next, use the plastic pry tool to carefully remove the back cover of the phone. Start at the edge and gently work your way around until the cover is completely detached. Be cautious not to apply excessive force to avoid damaging the back cover or the internal components.
With the back cover removed, locate the battery connector and use the plastic pry tool to disconnect it. It is crucial to disconnect the battery before proceeding to prevent any electrical damage. After disconnecting the battery, use the Phillips screwdriver to remove any screws securing the damaged screen.
Carefully disconnect any ribbon cables or connectors attached to the damaged screen. If adhesive is holding the screen in place, use a heat gun or hair dryer to gently warm the edges of the screen, making the adhesive easier to remove. Slowly and cautiously remove the damaged screen from the frame.
Now, take the new screen and align it with the frame of your Oppo Reno 11F. Ensure all ribbon cables and connectors are properly positioned. Secure the new screen with the screws you removed earlier. Reconnect the battery and any other connectors, making sure they are firmly in place.
Before reassembling the device, power it on to verify that the new screen is functioning correctly. Once confirmed, reattach the back cover, ensuring it snaps back into place securely. Insert the SIM card tray, and your Oppo Reno 11F will be ready for use with its newly replaced screen.
Throughout this process, take your time and handle all components with care to avoid common pitfalls. Following these steps methodically will help you achieve a successful screen replacement, ensuring your Oppo Reno 11F is back in optimal working condition.
Testing and Troubleshooting After Replacement
Once you have successfully replaced the screen on your Oppo Reno 11F, it is crucial to conduct a thorough test to ensure everything is functioning correctly. Start by powering on your device. If the device powers on without any issues, proceed to check the touchscreen responsiveness. Move your finger across the screen to ensure that all areas are responding accurately and that there are no dead zones.
Next, inspect the display for any dead pixels or anomalies. A dead pixel is a pixel that does not light up on your screen and can be distracting. To check for dead pixels, display a single-color background, such as black, white, red, green, and blue, and look for any pixels that do not change color.
Besides the screen, verifying the operation of other essential functions is necessary. Test the front and rear cameras by taking photos and recording videos. Ensure that the images are clear and that the camera focuses properly. Additionally, check the proximity sensor by making a call and seeing if the screen turns off when you bring the phone close to your ear.
Other components, such as the ambient light sensor and accelerometer, should also be tested. These sensors play a significant role in adjusting the screen’s brightness and managing screen orientation. Install an app that can test device sensors to ensure they are operating as expected.
If you encounter any issues, such as the screen not powering on or touch functionality problems, ensure that all connections are secure. Double-check the ribbon cables connected to the replacement screen to confirm they are properly seated. Additionally, cleaning any dust or debris from the connectors can resolve connectivity issues.
If the screen still does not respond after these checks, try performing a soft reset by holding down the power button until the device restarts. For persistent issues, it may be necessary to revisit the replacement steps to see if any components were incorrectly installed or damaged during the process.


There are no reviews yet.